Ranting about Football & Rivalries

>> Sunday, November 28, 2010

Can it really be Christmas already?  Wow!  Where does the time go?  Life around here has been somewhat really somber lately.  For those of you who don't know, my lil' family lives in Meridian, a suburb of Boise....home of the Boise State Bronco football team.  The one that was so close to making history.  And now...they are not.  :(  I, myself, did not attend Boise State but my wonderful husband did.  I attended the University of Idaho, a significant rival of BSU.  In fact, alumni from each school pretty much dislikes the other as much as they possibly can and there have been times in my 7 1/2 year marriage to a BSU fan that was not sunshine, lollipops and rainbows. 

But I have to be honest when I say I feel very bad for those football players from BSU.  To quote my husband, "(Friday's game) was like a bad ending to a good movie.  You're watching it and you think you know how it is going to end and then it just ends and you are left sitting there going, 'What in the hell was that?' "  That wasn't how their season was supposed to end. 

And I have to say that I am shocked by the excitement of my fellow alumni.  They are so stinkin' glad that this football team lost and I just don't get it.  Call me brainwashed for living with a Bronco, but it just is a game and they were so close.  And they were ARE an amazing team!  Not only on the field, but off.  They recently sponsored a child from Texas with Non-Hodgkin's Lymphoma who had an opportunity to  "Make A Wish".  He got to travel to Boise to be an Assistant Coach for a game.  Coach Petersen and his croonies went out of their way to make it happen for that kid.  How many other teams would do the same thing on their way to the top?  Not many, I say.  Not many. 

(Watch this video of what it meant to that family to visit Boise on his Make A Wish trip)

So...I say good job Broncos!  And keep your chins up because life isn't always about what happens on a football field. 

Read more...

Yummy Muffin Recipe!

>> Thursday, October 14, 2010

My kids love muffins so I am always trying new muffin recipes...or I am making good old standbys.  But today I tried a new one and it is scrumptious!  So I am sharing a photo & the recipe with you.  You will definitely want to make these!

Don't they look delicious? 

Here is the recipe:
(Courtesy of Taste of Home magazine)

You will need the following:
* 1 cup old-fashioned oats
* 1 cup whole-wheat flour
* 1/2 cup all-purpose flour
* 1/2 cup sugar
* 1 tsp. baking powder
* 1/2 tsp. baking soda
* 1/2 tsp. salt
* 1 egg
* 3/4 cup milk (I used 1%)
* 3/4 cup mashed ripe banana
* 1/2 cup creamy peanut butter
* 1/3 cup unsweetened applesauce
* 1/2 tsp. vanilla extract
* 3/4 cup miniature semisweet chocolate chips

Topping Ingredients:
* 1/3 cup packed brown sugar
* 1/3 cup dry roasted peanuts, coarsely chopped
* 1/3 cup miniature chocolate chips

Directions:
In a large bowl, combine the first 7 ingredients.  In a small bowl, combine the egg, milk, bananas, peanut butter, applesauce, and vanilla.  Stir into dry ingredients just until moistened.  Fold in chocolate chips.

Fill greased or paper-lined miniature muffin cups three-fourths full.  For topping, in a small bowl, combine the brown sugar, peanuts and chocolate chips.  Sprinkle over muffins.  Bake at 350 degrees for 10-13 minutes or until a toothpick comes out clean.

Cool for 5 minutes before removing from pans to wire racks. 

**I also made regular sized muffins and baked them for 20 minutes.**

Serve warm with a large glass of milk.  :)  Enjoy!

Read more...

Halloween Matching Cards (8 photos), by JoLynn Aldinger

>> Sunday, October 3, 2010


I'd like to share my Walmart Digital Photo Center photos with you. Once you have checked out my photos you can order prints and upload your own photos to share.

Read more...

Halloween Advent Calendar

>> Thursday, September 30, 2010

Oh my...where has the time gone?  Last post was September 9?  Really?  Doesn't seem like that long ago. 

So this evening, I am getting together with a few friends to make this ADORABLE Halloween advent calendar...
(photo courtesy of Oopsey-Daisy blog)

Cute, huh? 

So...I am thinking my kids are going to LOVE this when they get to start counting down the days tomorrow.  I am not a huge Halloween fan, but when you have little ones at home and they love the idea of collecting candy, then I need to go along with it. 

Do you have something special you do for Halloween?  What are your traditions?

~JoLynn

Read more...

The Craziness We Call Life and How I Fixed It

>> Thursday, September 9, 2010

Getting out the house to go to school & work last year was a nightmare for me and my 2 small children.

Let me tell you a story.

Picture this...

Me:
"Please go get your shoes on."

2 minutes later...

Me:
"GET YOUR SHOES ON!!!"

2 minutes after the last 2 minutes...

Me:
"NOW!"

A little bit later...

Me:
"Honey, you need to get your backpack ready. Where is it?"

Soon after...

Me:
"WHERE IS YOUR BACKPACK?"

Shortly after the soon after...

Me:
"I ASKED YOU WHERE IS YOUR BACKPACK???"


{DEEP BREATHS WERE TAKEN HERE...}


Were you able to imagine that?

Have you lived that moment?

It isn't pretty.

Nor is it fun.

A dear friend of mine came to the rescue one day during our Sunday Scrapbooking trips. She is the mother of 4 girls and she is the most organized mom I know. I aspire to be like her.  She has a binder for everything and a day planner that rocks.  With 4 girls who are involved in dance, tennis, girl scouts, piano lessons, and school activities, she has to be OR-GA-NIZED. 

Anyway, she was telling me about her chore chart that she bought when her kids were younger and how it helped her organize the responsibilities around the house. 

I was immediately intrigued.  I asked her to send me photos of it.  She did.

I was in love with a piece of wood and chore cards.

I thought I could track down the lady who  made it...OR...I could make one myself.  That's what I did.

And I love it.

It has brought a calmness to our morning like nothing else. 

No longer am I yelling, "GO GET YOUR SHOES ON RIGHT NOW!"...

Instead, I am simply asking, "Have you earned all your stars?" or "Have you done all your chores?"

And if they haven't, they can clearly see what they need to do before we leave the house in the morning.

And when everyone gets home in the afternoon, there are new chores to remind them to wash their hands (germs...germs...germs...), do homework, set the dinner table, tidy up their bedrooms, brush their teeth before bed, and say prayers.

It is fabulous.  And you can read all about it & more right here: Custom Made Chore Charts.

Read more...

Fall is in the air!

>> Tuesday, September 7, 2010

I love fall.  I won't even try to lie.  I love the changing leaves, the cooler weather, apple cider, pumpkins...I love it all.

So it will come to no surprise that I like decorating for fall and the subsequent holidays. 

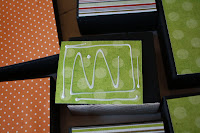
My latest project has been making some little decorations for Halloween.  I am not one to particularly like the scary aspect of Halloween...but I like to have a bit of fun.  These blocks fit the bill for "fun"!

I thought it would be fun to share with you how they were made and maybe it will inspire you to make some at home...or make something similar.  And if you don't want to exercise those creative bones in your body, you can buy them from my Etsy shop!  :)

The first step would be to get yourself three 2" x 4" wooden blocks cut to various sizes.  I think mine are roughly 5", 4", and 3". 


Sand them down to even out the rough edges....and then paint them.  I chose to paint mine black, but purple or orange or even a dark gray would look good. 

The next step is to choose some paper that you like and that matches your theme.  I decided to go with something that wasn't too busy with large shapes  & colors.  Cut your paper to the size of your blocks.  It doesn't need to fit on there perfectly, but it shouldn't hang over the sides.

Glue your paper on.  I decided to glue it on rather than using modge podge.  I questioned by decision when I was putting the modge podge on because it was bubbling...and I thought I had ruined the blocks, but the bubbles went away as the modge podge dried.  Before you seal the blocks, make sure you glue your letters on.  I used my Cricut machine to cut them.  If you don't have a Cricut or a similar machine, I suppose you could print them out on your printer and cut around them & glue them on.


After the modge podge had dried, I sanded the edges to give each block a distressed look.  Then I attached some ribbon to the "B" and some buttons to one of the "O" blocks. 

These adorable blocks will more than likely be gracing the top of our piano.  Now I am thinking about what else I can make....any ideas?  :)

Read more...

A breakfast you will want to try...

>> Saturday, September 4, 2010

Buttermilk Pancakes.

Seriously, this is one of our favorite breakfast foods.  I stumbled upon it over a year ago when I was searching one of my favorite blogs:  Becky Higgins.  She has a vast amount of recipes on her blog and this was one of them.  They sounded good & they looked good...and so I made them.  The recipe is a Martha Stewart one...no shocker there that something she made is scrumptious. 

They are yummy.

And they are even more delightful with peanut butter & syrup on top. 

Or a bit of homemade strawberry jam. 

Really...it doesn't matter.  They are that good.

Your mouth will thank you. 

And so will your family.

Bon Appetit!

Here is the recipe: 

2 cups all-purpose flour
2 teaspoons baking powder
1 teaspoon baking soda
1/2 teaspoon salt
3 tablespoons sugar
2 large eggs, lightly beaten
3 cups buttermilk
4 tablespoons unsalted butter, melted, plus 1/2 teaspoon for griddle

Heat griddle to 375 degrees. Whisk together flour, baking powder, baking soda, salt, and sugar in a medium bowl. Add eggs, buttermilk, and 4 tablespoons butter; whisk to combine. Batter should have small to medium lumps. Heat oven to 175 degrees. Test griddle by sprinkling a few drops of water on it. If water bounces and spatters off griddle, it is hot enough. Using a pastry brush, brush remaining 1/2 teaspoon of butter or reserved bacon fat onto griddle. Wipe off excess. Using a 4-ounce ladle, about 1/2 cup, pour pancake batter, in pools 2 inches away from one other. When pancakes have bubbles on top and are slightly dry around edges, about 2 1/2 minutes, flip over. Cook until golden on bottom, about 1 minute. Repeat with remaining batter, keeping finished pancakes on a heatproof plate in oven. Serve warm.


Read more...